
How to sort sent mails to a folder
If in case you have no Mailing List Manager (MLM) you can set up a rule. Creating a rule for this is:
Go to Tools and then open Rules.
Select criteria are met: IF Any to recipient contains (enter address or name whose mail is to be moved) and then go define an action THEN Move Message (select folder to which you want mails to be moved).
Doing this you can transfer all the mails to one folder.
.
Tuesday, March 31, 2009
SORTING SENT MAILS
Automatically moving a sent mail to a folder
If you want to transfer your reply mails automatically to a folder than you can do it just by using MLM if you are sending it to a group. There is an option of, "Also move messages I send to the list to this folder", where you define a folder where the mails are supposed to be transfered to.
.
If you want to transfer your reply mails automatically to a folder than you can do it just by using MLM if you are sending it to a group. There is an option of, "Also move messages I send to the list to this folder", where you define a folder where the mails are supposed to be transfered to.
.
MAKE YOUR OWN RULES
How to set up Rules in Entourage
In this post I am mentioning only the simple way to set up rules in Entourage. This post will be useful for new users only and the Mac masters have to jump to my next post.
Creating Rules:
1. Launch Entourage.
2. Go to tools and click on Rules.
3. Select the account type (whichever you are using)
4. Select the condition.
5. Once done then click on OK.
Deleting the Rules:
1. In Entourage, goto Tools.
2. Click on Rules and select the Rule that needs to be deleted and click on Delete.
Starters can also refer to Microsoft website for Entourage rather than wasting time in finding solutions on blogs. If still unable to get an answer then please write us, we will respond with exact solution charging you a smile in return.
.
ELEMINATING THE JUNKS
Junk Email settings
There is nothing much to be mentioned under this topic as Entourage 2004 and its latest edition i.e. Entourage 2008 has inbuilt feature for Junk emails. It automatically creates a junk folder and sorts all the junk mails arriving the inbox.
The basics of JMF (Junk Mail Folder)
[i] It is strictly not recommended to put your junk mail folder in deleted items as there is possibility of some good mails being moved to the junk folder.
[ii] JMF will not work on any contact that is added in your contacat list.
[iii] This is inbuilt in Entourage 2004 & Entourage 2008, in older versions you have to setup JMF manually.
If still you continue to get junk mails, you can get a free script to stop spam.
.
MANAGING YOUR MAILING LISTS
How to set up Mailing List Manager?
Before we move ahead lets be clear about what a mailing list is all about? These are groups over the net that you join and they send mails to you, generally they come in bulk so it is a wise idea to create a seperate folder for this so that your inbox is never over limit. It is recommended to subscribe to a mailing list as it is a good source of information and knowledge. Here is an example of a mailing list and its subscription.
Under mailing list manager rules, there is an option selecting which you can run more rules under one MLM (Mailing List Manager).
Process to setup MLM:
1. Launch Entourage and select a mail that you have received from the mailing list.
2. Go to 'Tools' from the menu bar and select 'New'.
3. MLM is smart enough to fill up most of the feilds by itself, but make sure from your end that the the feilds entered is according to your preference.
4. Now it will allow you to add new folder to transfer mails coming from this list. Create a new folder with the name that you can recognize easily. (if you have subscribed to many mailing list then create a main folder in the root and put subfolders in it with the name of mailing lists).
5. All the new mails from this list will now come directly to this folder.
6. If you want existing mails to be moved to the defined folder then select all the mails in the inbox and right click (or hold ctrl key with the click) and select 'Apply Rules' and 'All Rules'. This option will help you to move all the old mails sitting in the inbox to the selected folder.
This way without selecting the mails seperately you can transfer them to the desired folder.
.
RULE THE MAILS
Understanding the basics of Rules in Entourage
It is not worth telling you the purpose of rules as we all are well aware of the needs and the working method of rules in any mail client.
In Entourage rules are divided into three basic types:
(i) Mailing List Manager (MLM) (ii) Junk Mail Filter (JMF) (iii) Rules that you define
(i) Mailing List Manager: Pre-designed by Entourage that is very user friendly and easy to set up for incoming mails from mailing lists.
(ii) Junk Mail Filter: These are inbuilt rules by Entourage that are meant to stop the spam mails landing to your inbox.
(iii) Rules defined by you: These are very customizable criteria that you set in order to sort, delete or perform any other action with the mails. We will learn the details of setting up and working with rules here.
The order in which rules are executed are: First is Mailing List Manager (MLM), second is Junk Mail Filter (JMF) and last are Rules that you define.
# It is very important for us to know the instinct of Rules (created by you) in Entourage that when we create multiple rules, the rule on top in the list will also be on top priority.
.
EXPORT & IMPORT BUSINESS
Exporting or Archiving your mails in Entourage
Exporting mails in Entourage is same as we create .pst files in Outlook. Entourage uses .rge format to export or archive the files. The first step is by which you can archive selected mails to a folder. Using second step we can transfer all the contents of a folder.
Archivng selected mails in Entourage:
1. Launch Entourage.
2. Select the mails that needs to be archived.
3. Come under Message menu and click on Move To.
4. Select the name of the Folder where the mails are suposed to be Archived.
Archivng complete folders:
1. Launch Entourage.
2. Go to File menu and select Export.
3. Now check all the folders that are needed to be archived and click on the triangle pointing 4. towards right (the next icon).
4. Now name the file and define a location for that filen(that is supposed to be in .rge format).
5. Once exporting is complete, click on Done.
Importing archived mails:
1. Click on File menu in Entourage.
2. Go to Import.
3. Locate the .rge file that needs to be archived and click on right arrow.
4. Once importing is complete then click on Done.
SIGN YOUR MAILS
Adding Signature in Entourage
- Launch Entourage.
- Click on Tools menu and go to Signature.
- On this window click on New & enter the signature of your choice and give a name to your sign.
- Once done, click on close button on top left and it will prompt you to save the sign that you have created.
Setting a default Signature in Entourage
- Launch Entourage.
- Open Entourage menu and go to Account Settings.
- On this new window go to Options tab.
- Under Default Signature select the name of the sign that you want to be set as default and click on OK.
Changing a Signature temporarily
- This can be done from the New mail window itself from where you compose a new mail.
- Click on the pen icon that denotes signature and it will open a drop down displaying all the signs that you might have created.
- Select the appropriate on and continue composing your mail. It will have the new sign.
ENTOURAGE - The Most alluring mail client.
Creating a New Account in Entourage
Creating a new account in Entourage is simple than any other Email client that you have ever worked on. Here are the steps that you need to follow in order to set up a New POP account.
Creating a new account in Entourage is simple than any other Email client that you have ever worked on. Here are the steps that you need to follow in order to set up a New POP account.
- Launch Entourage, click on the Entourage menu (on the very top) then slect Account Settings.
- On this new Accounts window, click on drop down menu next to New and select Mail POP.
- Now hit the button Configure account manually.
- On this edit window enter the details i.e. in the Account name enter a name for this account to identify which Email is configured under this account.
- In the Name field enter the name that you want to be displayed when someone receives your mail (John Smith, JS Inc.)
- Enter your complete Email address in the E-Mail address box (e.g. john_smith@bigbird.net)
- Under the Account ID box enter first part of your email address (e.g. john_smith)
In the POP server, enter the POP server name that your administrator might have given you (it should be like pop.bigbird.net). - Now in the password field enter you password for your email address.
- For future convenience Save the password in my Mac OS keychain.
- In the SMTP server field enter smtp server name from administrator (like smtp.bigbird.net)
- Select the Click here for advanced sending options button.
- Put a check on "SMTP server requires authentication" box and close by clicking on the small square on top left. Click OK.
TIME CAPSULE - DEFEATING TIME WIRELESSLY
Apple has introduced Time Capsule, a wireless device that is an awesome product designed as companion hardware to the Time Machine automatic backup feature.
With Time Capsule, users will be able to go back through archived backups to find lost files, photos, digital media, and other data. Once the missing file is found, users can restore it wireless from Time Capsule; they can also restore an entire system from a Time Machine backup stored on the device.
Features & Pricing
If you are interested in analysing its technical specifications then let me mention it here:
- Time Capsule features dual-band antennas for 2.4GHz or 5GHz frequencies.
- It has one USB 2.0, one Gigabit Ethernet, and three Gigabit LAN ports.
- It can connect to print wirelessly from a USB printer.
- Time Machine offers Wi-Fi Protected Access (WPA/WPA-2).
- If you are keen about its security then for your information Apple reveals that it meets 128-bit WEP encryption.
Apple has set price that will make you think once before you buy, but again it is one of its type so pricing is really fair, it is of 500GB model for $299 and a 1TB version for $499.
CHALLENGING TIME WITH TIME MACHINE
Time Machine: Smartest Application in Mac OS X.
What Apple states it: "Time Machine is a backup utility, not an archival utility, it is not intended as offline storage. Time Machine captures the most recent state of your data on your disk. As snapshots age, they are prioritized progressively lower compared to your more recent ones."
Using simple words, it can be stated as an application to back up files on your machine on the same or an external hard drive (USB or Firewire), which later on can be used to retrieve deleted or lost files.
When time machine starts it copies each and every file leaving the caches on your machine to the selected drive, which you can call as back up drive. It copies all the files in it oringnal state without compressing it, so that when required it could turn your Mac in its oringnal state. Time Machine keeps backing up files at regular intervals after the first back up that is termed as incremental backup, while doing this 'incremental/follow up' back ups it copies only those files that are changed since last back up. One any day when follow up back up is done it creates a link to the unchanged files in the drive so that if you try to retreive data on that day, you could access all the files and data as it was on that date.
Whats so unique about Time Machine?
1. Did you ever imagine of an application which can help your Mac machine getting backed up on a different machine in a network, well Time Machine lets you do this. If you want to know the process of setting up Time Machine in network go to the next heading "Ways to backup data on Network" or on Shared Hard Drive this article can help you.
2. Unlike other back up systems it not only stores the file in back up instead Time Machine has the capability to show exactly how your Mac looked on the selected date.
3. Another feature that makes Time Machine superior than others is its ability to stop & resume according to your Mac. For instance, if Time Machine is in the process to backing up the data and you need to turn your Mac off and leave for office or leave office for a weekend, here again like other back up system back up process will not be cancelled but Time Machine stops and goes to sleep and as soon as your Mac is turned back on, it resumes back up from the point it stopped.
Ways to backup data on Network
1. One by One: Buy an external hard drive, connect it to one machine & activate Time Machine. Once done, take that drive and connect to all the machines one by one and Time Machine is smart enough to create seperate backup for all machines. This seems to be quite hard way of doing the work, next is smarter method of doing the same work.
2. Connect the external hard drive to one Mac and use network file sharing to create back up on this external drive.
3. Going further, Mac has launched much smarter way of doing this by using Time Capsule, a specially designed wireless hardware for a hassle free back up.
Step by step process to back up:
Posting two videos here. First video is by about activating Time Machine on a Mac and the other one is retrieving lost files or restoring machine's orignal state in past.
Retrieving old files or machine's state
If you have any query, please let us know, we assure complete solution for the issue.
Some other useful sites for troubleshooting Mac are Macworld, Mac 101 & OS X Hints. Among which Mac 101 is managed by Apple.
The only condition is that you can use only those drives for backup which are supported by apple, to find the details of supported drives go to Apple. If in case you do not have one of such type, just don't worry, click here and you will get help with using unsupported drives with Time Machine- A great Search!
DON'T PANIC DUE TO KERNEL PANIC
Kernel Panic Error
When the kernel (core) of any Operating system receives a command of an instruction which is not recognized by it or fails to act or manage properly then it shows up an error screen which is known as kernel panic error. The other reasons can be incompatible and damaged hardware, softwares or even drivers. All the versions of OS X can be affected due to this.
How it looks like
According to the version of OS, the look of kernel panic error may differ.
Fig KP1 shows how it looks in latest versions of OS 10.3 to 10.5

Figure showing kernel panic. Fig - KP1
The next figure (KP - 2) shows how it looks in in Mac OS 10.2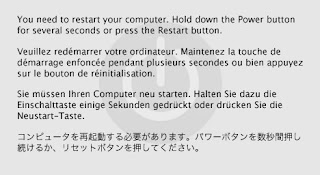
Figure showing kernel panic. Fig - KP2
Here (in Fig KP - 3) is the screen shot how it looks in OS 10.1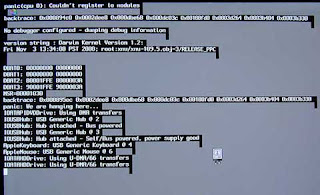
Figure showing kernel panic. Fig - KP - 3
.

Other reasond behind this could be RAM & motherboards, corrupted drivers, third party softwares & widgets and many more things like incorrect permissions on System-related files or folders, insufficient RAM and blank space in HD, also it could be bad sectors, corrupted directory, and other hard-disk ills. Even when AirPort® or AirPort Extreme card is not installed properly or is loose then it could result in kernel panic.
When the kernel (core) of any Operating system receives a command of an instruction which is not recognized by it or fails to act or manage properly then it shows up an error screen which is known as kernel panic error. The other reasons can be incompatible and damaged hardware, softwares or even drivers. All the versions of OS X can be affected due to this.
How it looks like
According to the version of OS, the look of kernel panic error may differ.
Fig KP1 shows how it looks in latest versions of OS 10.3 to 10.5

Figure showing kernel panic. Fig - KP1
The next figure (KP - 2) shows how it looks in in Mac OS 10.2

Figure showing kernel panic. Fig - KP2
Here (in Fig KP - 3) is the screen shot how it looks in OS 10.1

Figure showing kernel panic. Fig - KP - 3
.
Other reasond behind this could be RAM & motherboards, corrupted drivers, third party softwares & widgets and many more things like incorrect permissions on System-related files or folders, insufficient RAM and blank space in HD, also it could be bad sectors, corrupted directory, and other hard-disk ills. Even when AirPort® or AirPort Extreme card is not installed properly or is loose then it could result in kernel panic.
Fixing Kernel Panics after Security Update 2005-009 (For Tiger)
I faced this problelm when I had OSX 10.4 and here is the solution that I have tried, after installation I deleted the cache files. Just to clear the misconception that you can start Mac in safe mode as I have mentioned earlier (hold shift key while system starts up). Once your machine is up, then find these files in given location and delete it.
/Library/Caches/com.apple.ATS
/System/Library/Extensions.mkext
/System/Library/Extensions.kextcache
/System/Library/Caches/com.apple.kernelcaches
Now come in /Library/Caches and delete all the com.apple.LaunchServices files.
Doing this worked in my case, hope it will work for you too.
KERN_PROTECTION_FAILURE: The name might sound similar to kernel panic but KERN_PROTECTION _FAILURES are not kernel panics. These prompts could be solved by repairing permissions. They could simply be fixed when you go to Applications -> Utilities -> Disk Utility -> First Aid -> select hard disk in Disk Utility, and click repair permissions.
BREAKING THE CHAIN
Fixing Keychain issues
What is Keychain & how it works?
The Keychain consolidates various passwords and passphrases in one place and makes them accessible through a master password or passphrase. When an application (including the Finder) needs to access a password stored in the Keychain, the application asks you to unlock the Keychain if it is not already open. However there are certain settings in Keychain application which, when done, system will not prompt you for password & log you in straight away.
Keychain Access & Keychain Minder
These are two contributors to Keychain, of which Keychain Access being the main controlling system and Keychain Minder is used just to change the Keychain master password, specially in the case when you don't remember the old one.
Changing the password with Keychain Access
Once you key-in the correct details, you are all set to go with your new password.
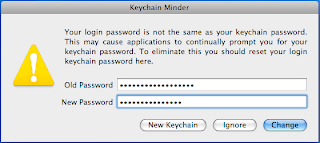
Changing the password with Keychain Minder:

Now key-in the old password followed by the new one then click on change, and that's done.
PLAYING WITH KEYCHAIN:
Well, the article above might be quite good for you, but it won't help the users who have lost their old passwords. If you are a corporate user, then you might be entering the password only in a couple of months and there is more tendency to forget your old password.
IN CASE YOU DON'T REMEMBER THE PASSWORD: There are few tweaks that you can use to unlock keychain even when you don't remember your passwords.
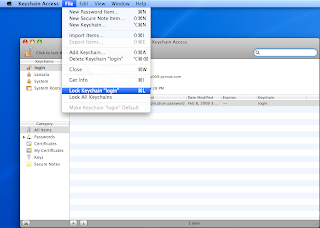
Unable to open Keychain Minder: Sometimes it might happen that you won't be able to open Keychain Minder, it will flash once & disappear. In such instance, open Keychain Access, go to File and select "Lock Keychain Login". Once done then try to open Keychain Minder & it will open up. Now you can enter your new password & your Mac is ready to take off.
Steps to follow when Keychain Minder is not coming up.
STAYING AWAY FROM WEB OF KEYCHAIN: Being a simple user if you want to stay away from the complexities of keychain, you could do by following the below mentioned step. Its just a matter of two clicks:
This is the screen where you will get those two options that you need to check on.
What is Keychain & how it works?
The Keychain consolidates various passwords and passphrases in one place and makes them accessible through a master password or passphrase. When an application (including the Finder) needs to access a password stored in the Keychain, the application asks you to unlock the Keychain if it is not already open. However there are certain settings in Keychain application which, when done, system will not prompt you for password & log you in straight away.
Keychain Access & Keychain Minder
These are two contributors to Keychain, of which Keychain Access being the main controlling system and Keychain Minder is used just to change the Keychain master password, specially in the case when you don't remember the old one.
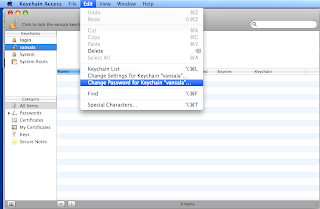
Changing the password with Keychain Access
- Go to Applications (Command+Shift+A) and Open Utilities.
- Locate Keychain Access & open it.
- Click on Edit and select Change Password for Keychain.

- This will open a new window, prompting you to enter the old password & new one following its confirmation.
Once you key-in the correct details, you are all set to go with your new password.
Changing the password with Keychain Minder:
- Go to Applications (Command+Shift+A) and Open Utilities.
- Locate Keychain Minder & open it, once done, you will get a window like this:


Now key-in the old password followed by the new one then click on change, and that's done.
PLAYING WITH KEYCHAIN:
Well, the article above might be quite good for you, but it won't help the users who have lost their old passwords. If you are a corporate user, then you might be entering the password only in a couple of months and there is more tendency to forget your old password.
IN CASE YOU DON'T REMEMBER THE PASSWORD: There are few tweaks that you can use to unlock keychain even when you don't remember your passwords.
- Go to Keychain minder and just enter you new password & click on "New Keychain" this will create a new keychain and old ones will be inactive from here onwards.
Unable to open Keychain Minder: Sometimes it might happen that you won't be able to open Keychain Minder, it will flash once & disappear. In such instance, open Keychain Access, go to File and select "Lock Keychain Login". Once done then try to open Keychain Minder & it will open up. Now you can enter your new password & your Mac is ready to take off.

Steps to follow when Keychain Minder is not coming up.
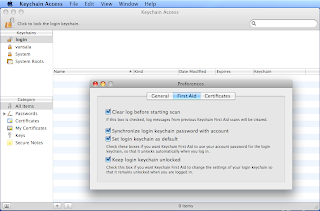
STAYING AWAY FROM WEB OF KEYCHAIN: Being a simple user if you want to stay away from the complexities of keychain, you could do by following the below mentioned step. Its just a matter of two clicks:
- Go to Keychain Access.
- Under preferences select First Aid.
- Now select Synchonize login keychain password with account & Keep login keychain unlocked.
Recommended by www.Apple.com

This is the screen where you will get those two options that you need to check on.
LOST ALL THE KEYS IN KEYCHAIN: If your time is bad, the keychain in your Mac machine may forget all the keys store in the keychain and if this is the case, we can solve it easily, here is the sequence that you need to follow:
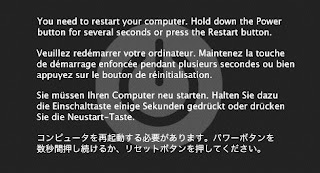
- Go to your home folder & find the Library folder.
- Now drag the Keychains folder to the trash.
- Restart the computer and a new keychain will be created using your current system password.
These steps will positively fix this issue.
IS THERE STILL SOMETHING LEFT UNRESOLVED? Ok, click on this link, and let apple website do the job. This will help you to download a new keychain & get your keychain fresh and active.
WHEN YOUR MAC IS NOT TURNING UP
PROBLEM IN TURNING THE MACHINE UP (for 10.3 and older only)
The worst thing you could ever experience in a computer is not turning up. No matter how many times you do a hard boot but the result is same. If the machine is Mac, there could be variations in error notification. Most of the time it is a simple issue that you could fix after going through this article.
IDENTIFYING THE SYMPTOMS
Solution Two: This could be due to third party items lined up in your start up. To fix this, start your Mac in safe mode and then follow these steps:
a. Go to the hard drive.
b. Find there two folders /Library/StartupItems and /System/Library/StartupItems and drag the third party application out of it. If they are important, then save them in Users folder. Make sure that you don’t touch any item if you have even a little doubt that the application is pre-installed by Mac or is a third party.
c. Now lets restart with the hope that the issue will be fixed.
Solution Three: If the Login item is incompatible, then it could create this issue. Follow those five simple steps to resolve this:
a. Start in Safe mode.
b. Go to system preferences.
c. Use View menu to choose account and then select Startup items. If you have OS 10.2 select Login Items from the View menu.
d. You have to remove all the Login items.
e. Now restart the machine from Apple icon.
f. The issue will be fixed, now add the Login items one by one till you face this issue again, once you come to know which item is creating issue, you can delete it from the list.
Solution Four: A small setting in Network preferences might also cause this, it happens when you select "Connect automatically when starting TCP/IP applications". In this case, preferences file that has this setting should be deleted, if you follow this, all the settings will be reset and later on you need to configure them in order to get connect to internet or your office or home network.
Start computer in single user mode (if you want to learn about single user or verbose mode, please find in blog posted on 08.02.2009)
a. Type mount -uw /
b. Hit Return/Enter.
c. Type the following command as per your OS. For OS 10.2 type mv /var/db/SystemConfiguration/preferences.xml preferences.old For OS 10.3 to 10.3.9 type mv/Library/Preferences/SystemConfiguration/preferences.plist preferences.old
d. Hit Return/Enter.
e. Type reboot
f. Hit Return/Enter.
If it still continues, follow next solution.
Solution Five: Start computer in single user OR Verbose mode (if you want to learn about single user or verbose mode, please find in blog posted on 08.02.2009)
a. Type mount -uw /
b. Hit Return/Enter
c. Now type mv /Library/Preferences/com.apple.loginwindow.plist preferences2.old
d. Hit Return/Enter
e. Again type mv /Library/Preferences/com.apple.windowserver.plist preferences3.old
f. Hit Return/Enter
g. Type reboot
h. Hit Return/Enter
Remember: You have to put a space between ".plist" and "preferences".
 Before we start, let me show you how Kernel panic error screen looks like. Phrase ofthe message could be somewhat like "Unresolved kernel trap"
Prohibitory icon looks like the picture on the right.
Prohibitory sign generally comes when a file is moved, replace, deleted or damaged. There are a small list of hardwares and softwares which, if used, can cause this to happen. The easiest solution is reinstallation of OS, but it usually is not preferable. So try these advance steps:
The worst thing you could ever experience in a computer is not turning up. No matter how many times you do a hard boot but the result is same. If the machine is Mac, there could be variations in error notification. Most of the time it is a simple issue that you could fix after going through this article.
IDENTIFYING THE SYMPTOMS
- There can be empty blue screen with a spinning wheel (the progress indicator in Mac).
- A "Prohibitory sign" appears or "Kernel panic error" is mentioned on the screen.
- Blank gray screen without any text could appear.
- No notification, but machine doesn't turns up.
There can be empty blue screen with a spinning wheel (the progress indicator in Mac).
I am mentioning 5 simple steps that you can try and hope it will work for you, but if in any case it doesn't works then try the last few steps that are slightly critical but I know you will easily do it because you can't sit back and wait with a quite expensive Mac machine.
Solution One: This could happen when you have upgraded form OS 9 to OS X as the later reviews the font in the former system. Damage in OS 9 font system might cause this to happen. So to fix this, put the OS 9 CD in the machine, drag the font folder to the desktop & restart the machine. This should fix this issue if it is caused by font disorder, but make sure you drag the folder from OS 9 otherwise the condition will still remain same.Solution Two: This could be due to third party items lined up in your start up. To fix this, start your Mac in safe mode and then follow these steps:
a. Go to the hard drive.
b. Find there two folders /Library/StartupItems and /System/Library/StartupItems and drag the third party application out of it. If they are important, then save them in Users folder. Make sure that you don’t touch any item if you have even a little doubt that the application is pre-installed by Mac or is a third party.
c. Now lets restart with the hope that the issue will be fixed.
Solution Three: If the Login item is incompatible, then it could create this issue. Follow those five simple steps to resolve this:
a. Start in Safe mode.
b. Go to system preferences.
c. Use View menu to choose account and then select Startup items. If you have OS 10.2 select Login Items from the View menu.
d. You have to remove all the Login items.
e. Now restart the machine from Apple icon.
f. The issue will be fixed, now add the Login items one by one till you face this issue again, once you come to know which item is creating issue, you can delete it from the list.
Solution Four: A small setting in Network preferences might also cause this, it happens when you select "Connect automatically when starting TCP/IP applications". In this case, preferences file that has this setting should be deleted, if you follow this, all the settings will be reset and later on you need to configure them in order to get connect to internet or your office or home network.
Start computer in single user mode (if you want to learn about single user or verbose mode, please find in blog posted on 08.02.2009)
a. Type mount -uw /
b. Hit Return/Enter.
c. Type the following command as per your OS. For OS 10.2 type mv /var/db/SystemConfiguration/preferences.xml preferences.old For OS 10.3 to 10.3.9 type mv/Library/Preferences/SystemConfiguration/preferences.plist preferences.old
d. Hit Return/Enter.
e. Type reboot
f. Hit Return/Enter.
If it still continues, follow next solution.
Solution Five: Start computer in single user OR Verbose mode (if you want to learn about single user or verbose mode, please find in blog posted on 08.02.2009)
a. Type mount -uw /
b. Hit Return/Enter
c. Now type mv /Library/Preferences/com.apple.loginwindow.plist preferences2.old
d. Hit Return/Enter
e. Again type mv /Library/Preferences/com.apple.windowserver.plist preferences3.old
f. Hit Return/Enter
g. Type reboot
h. Hit Return/Enter
Remember: You have to put a space between ".plist" and "preferences".
When a "Prohibition sign" appears or "Kernel panic error" is mentioned on the screen.
 Before we start, let me show you how Kernel panic error screen looks like. Phrase ofthe message could be somewhat like "Unresolved kernel trap"
Prohibitory icon looks like the picture on the right.
Prohibitory sign generally comes when a file is moved, replace, deleted or damaged. There are a small list of hardwares and softwares which, if used, can cause this to happen. The easiest solution is reinstallation of OS, but it usually is not preferable. So try these advance steps:
- If you have moved, deleted or even renamed apple installed folder, bring them back to their orignal state with due honour. If you want, I can name some of them for you, like Applications, System or Library.
- Even if you try to edit of modify previledges of OS X System files, it may lead to Kernel Panics.
- As I mentioned, some of hardwares & softwares might cause this, they are (not limited to) listed here: Airport Extreme Card, PC card Modem, Matrox RTMac Card, 2D/3D Professional graphics card(128 bit), the installing driver of an application may also cause this to happen.
Blank grey screen without any text could appear.
- Go to Apple Downloads and check that you have installed the latest version of firmwares.
- Devices like ADB, serial, USB, FireWire, SCSI, and PCMCIA can create this issue, so the steps you need to follow is that disconnect al the devices once the issue gets resolved, then connect all the devices one after the other each restarting to find out which one is creating this problem.
- Sometimes third party hardware upgrades can also play with your system including, but not limited to RAM, microprocessor upgrade cards, PCI cards etc. Follow the previous steps to fix this.
- If you can, then reset your computer's Power management unit. This should fix the issue.
No notification, but machine doesn't turns up.
In order to fix this, try the steps we followed for "Grey screen error".

HOW TO LOGIN AS SINGLE USER OR VERBOSE MODE?
For all OSX & OSX Servers
Starting a Mac machine in Verbose or Single user mode is generally user for troubleshooting and Software Development. I am publishing a seperate article on this because in many of the troubeshooting steps that I have asked you to start your Mac in Verbose mode or single user mode in my last articles.
Process to start in these modes:
- You need to shut down the machine, for new users I would like to add that you if in case you need to do a hard reboot of your machine, please keep the power button pressed for more that six seconds, reason being Mac goes in sleep mode if you press the power button for 3 seconds and you will never know if your Mac is completely turned off is just sleeping.
- After starting the machine, press Apple key and one of the v/s keys in combination. Here 'v' will take you to Verbose mode and 's' will take you to Single user mode.
To Exit from Verbose and Single user mode: You need to type reboot while exiting from Single user mode but if you are in verbose mode all you need is to reboot the machine & it will exit and restart in normal mode.
When you login to Single user mode, the layout of your keyboard will be American English.
If Firmware Password Protection is enable by administrator or owner of the computer, you won't be able to login to Verbose mode.
STARTING MAC IN SAFE-MODE
For MAC OSX (Only OSX will be supported in this post)
If you need to start your Mac machine in Safe Mode (Safe Boot), please follow these steps:
1. Make sure you machine is turned off/shut down.
2. Now press the power button.
3. As soon as you hear the startup tone, press the Shift key. The Shift key should be held in a fraction of seconds, but make sure, you don't do it before the tone.
4. Leave the Shift key when you see the start up screen (gray Apple icon) and the progress indicator (in Mac it is a colored spinning wheel).
While startup in Mac OS X 10.4 or newer version, you will see "Safe Boot" on the first login window, (which will appear even if you do a normal login automatically.
During startup in Mac OS X 10.2 through 10.3.9, you will see "Safe Boot" on the Mac OS X startup screen.
If you don't want to start you Mac in SafeMode, just restart the machine normally, without holding any keys during startup. If you are new to Mac then please go to this guide.
Subscribe to:
Posts (Atom)


